Server Build Part 3 - Virtual Machines

Proxmox VE offers two different types of virtual environments. The first is Linux containers (LXC) which provides a very lightweight way to run an isolated virtual Linux environment which utilize the kernel and resources of the host Linux. It is different from something like Docker which provides containers for an entire application stack. In fact, because Proxmox runs unprivileged containers by default and Docker uses systems calls which a require privileged containers it’s not recommended to run Docker in a Linux container.
The second type are Qemu/KVM Virtual Machines which run as fully virtualized hardware including BIOS, disk, and network devices. Through the use of paravritualized drivers such as virtio in the guest operating (e.g. Windows), it is possible to get very good performance. It’s even possible to pass through PCIe devices, such as graphics (GPU) cards directly into the VM.
One of the wishlist ideas I had was to create my own game streaming service using a Windows 10 VM, GeForce Experience, and Moonlight. I did try a proof-of-concept after installing Proxmox, but it didn’t work initially and I decided to circle back to it later. I suspect the GeForce 1060 Super card I bought is just a bit too new for the drivers I was able to find.
Provision the Provisioner
The first VM I created, as a Linux container, is called ‘provision’ because it’s going become the base for infrastructure automation using Ansible and other tools. I used the Debian 10 template available the Proxmox web interface by clicking on the tempates button in the content section of a storage area that supports tempates. Alternatively, you can use the “pveam” command from the command line. If you are adventurous, there are several tools for creating your own templates.
Using the “Create CT” wizard, I provided the hostname, root password, SSH public key, template, number of vCPUs, memory, root disk size and location, network, and DNS options. For network options, I chose the bridge option which allows it to appear on my network alongside all of the other physical devices. In addition, because I’m using VLAN tagging with Unifi, the container can be on a different network segment from the physical host. This becomes important later. All that’s left to do is log in, create a non-privileged user, install Ansible, and clone my Ansible github repository. Once everything becomes stable, I will be scheduling playbooks to run. This will make sure everything is consistently configured across the the board.
Rancher OS
The primary way I will be self-hosting services is with Kubernetes which provides container orchestration on top of an application container such as provided by Docker. It supports clustering, will autoscale as load increases, and can manage the services on its own (e.g. self-healing). This is probably overkill to start, but this is a learning opportunity and I want things to be able to scale easily as my needs grow.
Rancher is a management platform which supports multiple Kubernetes clusters across multiple platforms whether locally or on a cloud provider. Rancher OS provides a lightweight Linux distribution for running and managing Docker to which we can add Rancher and get ourselves a functioning Kubernetes cluster in just a few minutes.
First, I downloaded the latest Proxmox Rancher OS ISO and placed it on the storage area which I set aside for ISOs (remember, it’s a QNAP NFS share). Then I create my first a Rancher OS VM, called “kube”. I will be converting this VM into a template so it can be easily cloned.
The creation of the VM is similar to a Linux Container, but before I start it I will add a CD-ROM device which maps to the Rancher OS ISO that I downloaded. I went with 4GB of memory, 4 vCPUs, default BIOS, default display, default machine (i440fx), VirtIO SCSI, a 32GB disk, and virtio vmbr0 network device on the DMZ VLAN. Additionally, under hardware, I added a Cloud-Init device which will allow the configuration of key things like username, password, network/DNS configuration, and (very important) an ssh public key from the Cloud-Init section of the VM configuration. Cloud-init support can be added to any (Linux) VM by installing the cloud-init package for its distribution, but the Rancher OS Proxmox image already has this.
When the VM is booted from the ISO, it will go to a prompt for the rancher user requiring no password. This will be the “live CD” version of Rancher where it can then be installed to disk (if you used Cloud-Init, you should be able to skip the part about creating the cloud-config.yml file):
$ sudo ros install -d /dev/sda
Once installed and rebooted from the new root filesystem (don’t forget to set the boot order), the VM should be available via SSH as the rancher user. The password for the rancher user is not blank, it’s just not a valid password so you cannot ssh as that user except using an ssh authorized key. When using sudo, no password will be required.
$ ssh rancher@kube
or if no local DNS
$ ssh rancher@192.168.x.x
That should all that is required to set the kube VM template. You can verify that Docker is functioning with some docker commands if you’d like. In Proxmox, I converted the VM to by right-clicking VM and selecting “Convert to Template” in the management GUI. Now I can easily clone and create new nodes as needed.
Here are the nodes I created:
- Kubein - A dedicated ingress node for the cluster. Ideally, you’d want more than one but I’d need a layer 4 load balancer and I only have the option to port forward to one internal address. It is important to set the node affinity on the the ingress workload (NGINX or Traefik) to this node.
- Kubemgr - A dedicated node for running the Rancher management container
- Kubenode1 through Kubenode3 - Worker nodes
In the future, these VMs reside on different physical hosts such as in a Proxmox cluster or I can add additional nodes across the cluster.
Kubernetes
Now it’s time to configure the Kubernetes (k8s for short) cluster. First, I installed the Rancher Docker container on the kubmgr node:
docker run -d --restart=unless-stopped -p 80:80 -p 443:443 rancher/rancher:latest
Alternatively, if you want it to run on non-standard ports to avoid conflicting with ingress ports:
docker run -d --restart=unless-stopped -p 9005:80 -p 9006:443 rancher/rancher:latest
Now I go to a browser, and log in to Rancher, create an admin user, and create a new cluster:
- Select ‘Add Cluster’ from top right
- Click ‘From existing nodes (custom)’
- Select the options for the cluster
In my initial install, I followed a guide which said to deselecting NGINX Ingress under Advanced. The idea was to use Traefik instead of NGINX for ingress, but I could not get it to work with Cert-Manager and Let’s Encrypt. Fortunately, it was easily to delete all of the node VMs and re-create them. I’m sticking with NGINX until I better understand what I’m doing.
The next step adds nodes to the cluster by selecting the roles the node will run and generating a command to be run on that node. Then I just had to ssh to the node and execute the command it gave me. The command will bootstrap the node into the cluster as long as it can communicate with the node running the Rancher container. The three roles in k8s architecture are etcd, control plane, and worker node. I configured the nodes as:
kubemgr - etcd, control plane
kubein - control plane, worker
kubenode1, kubenode2, kubenode3 - worker
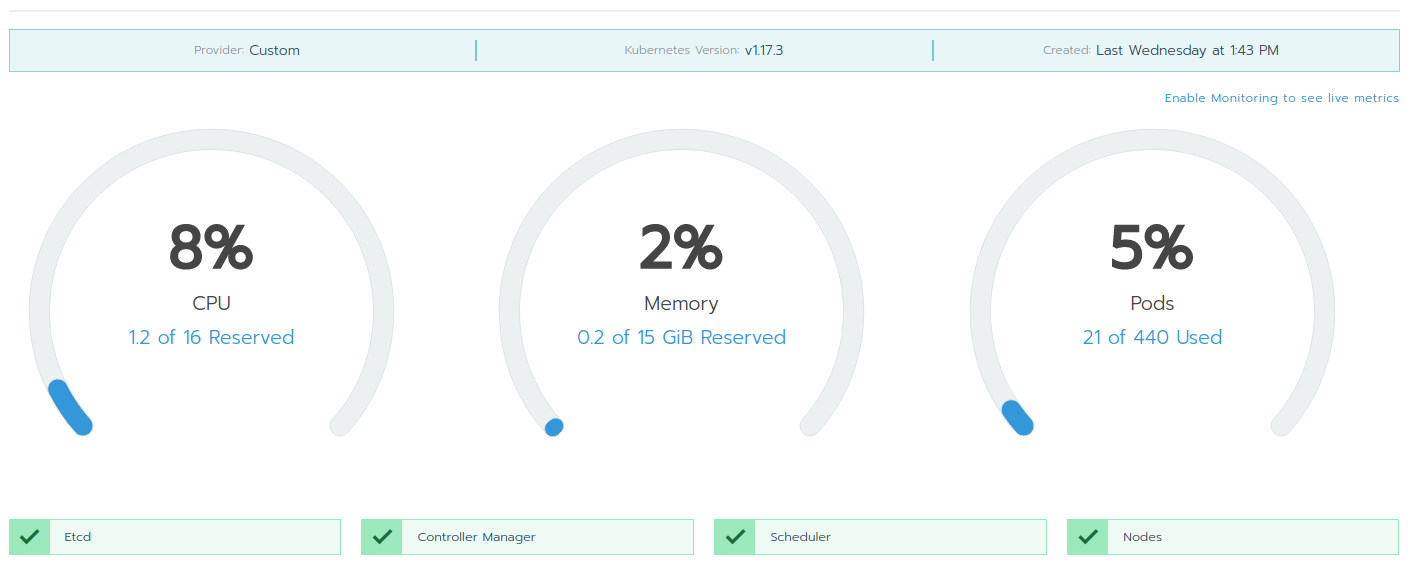
Now I have a functioning Kubernetes cluster!
Kubectl
Next I installed the kubectl CLI on my workstation (doesn’t have to be any of the k8s nodes). I found it helpful to become familiar with using kubectl to directly interact with the cluster. The Rancher user interface is great, but there are some things it can’t do easily. I recommend seeking out some Kubernetes tutorials to get familiar with it.
I did an install of kubectl using the instructions for my operating system. To do this, I had to create a kubeconfig file by copying it from kubeconfig button at upper-right of the Rancher GUI. Configured correctly, this is the result:
$ kubectl cluster-info
Kubernetes master is running at https://kubemgr/k8s/clusters/c-4mvcw
CoreDNS is running at https://kubemgr/k8s/clusters/c-4mvcw/api/v1/namespaces/kube-system/services/kube-dns:dns/proxy
Next, I will deply my first workload, configure Cert-Manager and Let’s Encrypt, and set up ingress rules.